
The smell of peppermint extract fills your kitchen the second you add it to the bowl. These Candy Cane Cookies start with a soft cream cheese dough that twists into shape without cracking. They’re festive enough for a cookie exchange, soft enough that kids actually finish them, and just minty enough to stand out on a cookie tray.

This post contains affiliate links. As an Amazon Affiliate, if you purchase through those links, I earn a commission. Thank you!
I make these every December for Christmas cookie swaps and holiday dessert gifts because they look bakery-quality and travel well. Kids love helping twist the dough, and adults appreciate how they taste like actual peppermint candy. They stay fresh at room temperature for up to 5 days, or freeze the shaped dough for up to 3 months.
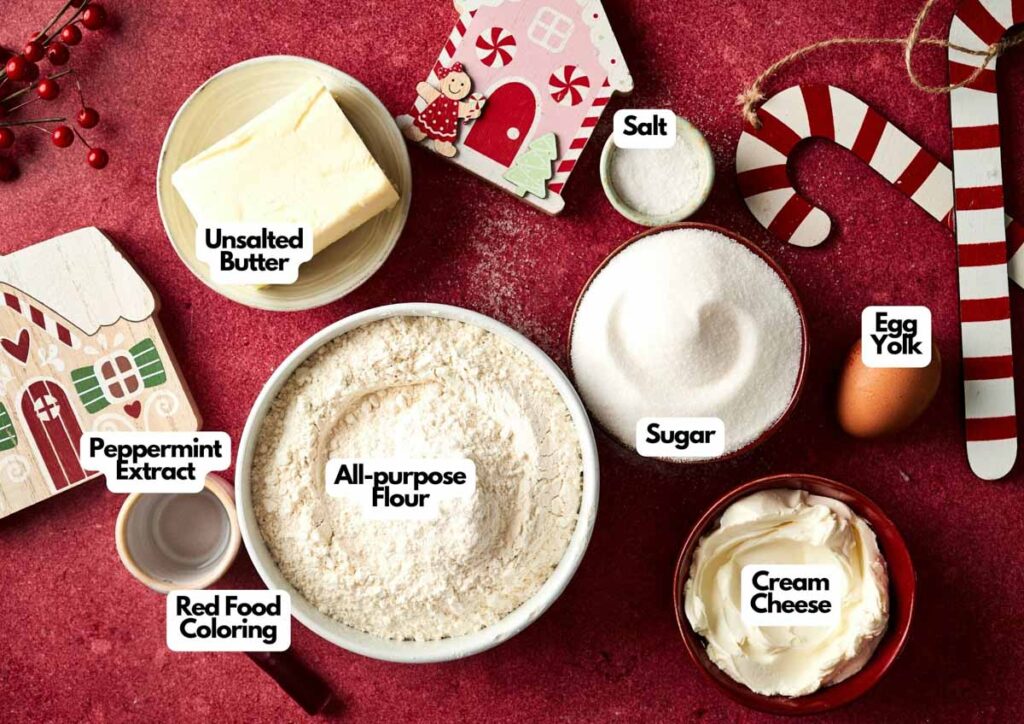
Ingredients You’ll Need
You’ll need all the ingredients shown in the photograph below.
How to Make Peppermint Cream Cheese Candy Cane Cookies with Step-By-Step Instructions
Scroll down for the full recipe card containing a full printable recipe and measurements in both US customary and metric units.
Let me walk you through exactly how easy these candy cane cookie recipes are from start to finish.
Beat the Butter Until Creamy
Start by beating your room temperature butter in a stand mixer for about 30 seconds. I always use this stand mixer for cookie dough because it creams butter more evenly than hand mixing, which gives you the smooth, fluffy texture these cookies need.
Mix in the Cream Cheese and Sugar
Add your cream cheese and mix until everything’s smooth with no lumps. Combine the sugar and beat on medium speed until the mixture looks light and fluffy.
This step is important because it creates air pockets that keep your cookies tender.
Add the Wet Ingredients and Flour
Mix in your egg yolk, peppermint extract, and salt. Then, gradually add your flour on low speed, mixing just until you don’t see any dry streaks. Don’t overmix here or your cookies will turn out tough.

SERIOUSLY GOOD
DESSERTS!
Dessert First is a collection of 61 RECIPES to show you that you can make beautiful, impressive desserts right in your own kitchen, no matter your skill level.
Immediate eBook download. No physical book available.
Includes ad-free recipes like:
∙ Lemon Pound Cake
∙ Starbucks Cake Pops
∙ Boston Cream Pie
∙ Chocolate Mousse
∙ Matcha Tiramisu
...and much more!

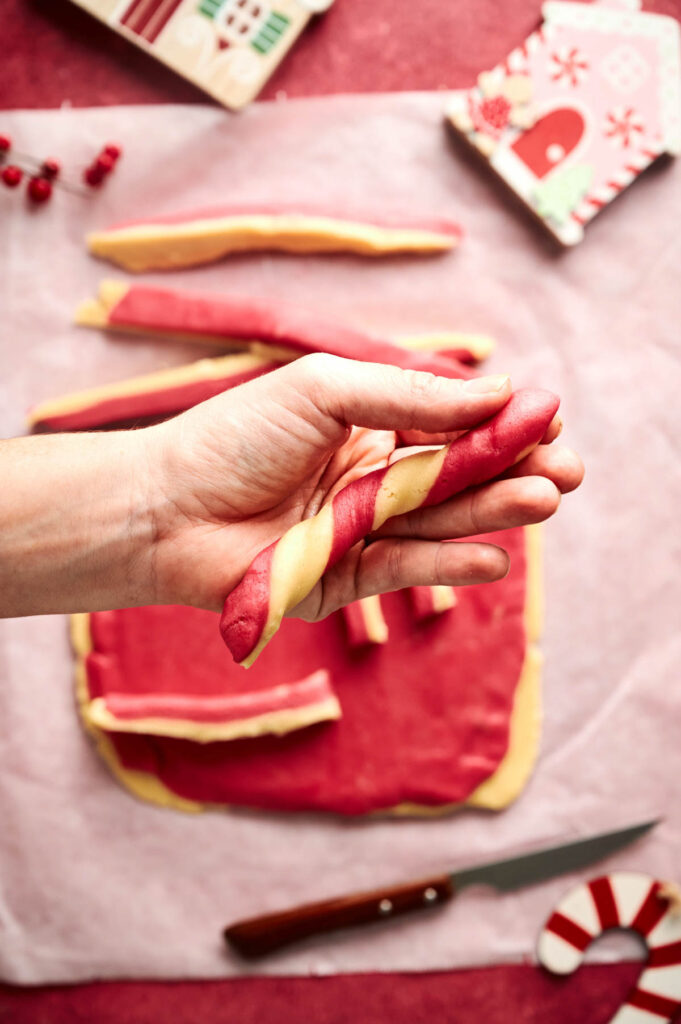
Divide and Color the Dough
Divide the dough in half. A bench scraper makes it easy to cut the dough cleanly and evenly.
Leave one half plain and tint the other half with red food coloring. Gel food coloring gives you vibrant color without adding extra liquid that can change the dough’s consistency. Knead the gel into the dough until the color is evenly blended with no streaks.
Roll Out Both Dough Portions
Roll each half of the dough separately between two sheets of parchment paper into rectangles that are about ¼ inch thick, 5 inches wide, and 18 inches long. I use this silicone baking mat for this step because the dough won’t stick, and you can roll directly on it.
If your dough feels too soft and sticky, pop it in the fridge for a few minutes.
Stack and Chill the Dough Layers
Chill both rolled sheets for 10 minutes. Then stack the red dough on top of the plain dough and gently roll them together with a rolling pin to form a ½-inch-thick rectangle.
Wrap the whole thing in plastic wrap and refrigerate for 45 minutes until it’s firm. This chilling time is critical because it makes the dough easier to slice cleanly.
Cut and Shape the Candy Canes
Cut your chilled dough crosswise into ½-inch-wide strips that are about 5 inches long. Roll each strip gently between your palms to round the edges and smooth out any sharp corners.
Then twist each strip into a spiral and curve one end to form that candy cane hook shape. Place them on a baking sheet lined with parchment paper.
Chill Again If Needed
Keep working through all your dough strips, shaping each one into a candy cane. If the dough gets too soft while you’re working, stick it back in the fridge for a few minutes. Soft dough won’t hold its shape in the oven.
Freeze Before Baking
Preheat your oven to 350°F. An oven thermometer is helpful here because if your oven runs too hot, these delicate cookies will spread and lose their definition.
While it’s heating up, place one tray of shaped cookies in the freezer for a few minutes to firm them up. This quick freeze helps them keep their twisted shape when they hit the hot oven.
Bake Until Set
Bake for 7 to 8 minutes, just until the cookies are set but not browned. You want them to look almost underbaked when you pull them out.
They’ll firm up as they cool, giving you a soft, melt-in-your-mouth texture instead of a hard, crunchy cookie. I use my cooling rack to allow air to circulate under the cookies.

Serve
When you’re ready to serve these cookies, arrange them on a platter and enjoy!
If you need to transport them to a party or cookie exchanges, layer them between sheets of parchment paper in a sturdy container to prevent breakage. The candy cane shape can be delicate, so avoid stacking them too high and keep the container level during transport.
For longer trips or to keep them fresh, I use this insulated casserole carrier to protect them from temperature changes. I always tuck a folded kitchen towel around the container to keep it from sliding around.

Candy Cane Cookies
Equipment
Ingredients
- 1 cup unsalted butter room temperature
- 4 ounces cream cheese room temperature
- 1⅓ cups granulated sugar
- 1 large egg yolk
- 2 teaspoons peppermint extract
- ½ teaspoon salt
- 3½ cups all-purpose flour
- Red gel food coloring baking-safe
Instructions
- In the bowl of a stand mixer fitted with the paddle attachment, beat the butter until creamy, about 30 seconds.1 cup unsalted butter
- Add the cream cheese and mix until smooth. Add the sugar and beat on medium speed until fluffy.4 ounces cream cheese, 1⅓ cups granulated sugar
- Mix in the egg yolk, peppermint extract, and salt until fully combined. Gradually add the flour on low speed and mix just until incorporated.1 large egg yolk, 2 teaspoons peppermint extract, ½ teaspoon salt, 3½ cups all-purpose flour
- Divide the dough in half. Leave one half plain, and tint the other half with red gel food coloring until evenly blended.Red gel food coloring
- Roll out each dough half separately between two sheets of parchment paper into rectangles about ¼ inch thick, 5 inches wide, and 18 inches long. If the dough is too soft, chill briefly to make it easier to handle.
- Chill both rolled dough sheets for 10 minutes. Stack the red dough on top of the plain dough and gently roll with a rolling pin to press them together into a ½-inch-thick rectangle. Wrap in plastic wrap and refrigerate for 45 minutes, or until firm.
- Cut the chilled dough crosswise into ½-inch-wide strips, about 5 inches long. Roll each strip gently between your hands to round the edges, then twist into a spiral. Curve one end to form a candy cane shape and place on a parchment-lined baking sheet.
- Repeat with the remaining dough, chilling again if it becomes too soft.
- Preheat the oven to 350°F (180°C). While heating, place one tray of shaped cookies in the freezer for a few minutes to firm up.
- Bake for 7–8 minutes, until set but not browned. Allow to cool before serving.
Video
Notes
- Mix thoroughly and use real butter: After adding each ingredient, scrape down the side of the bowl with a spatula to ensure everything incorporates evenly. Real butter gives the richest flavor and best texture compared to margarine or spreads, and it creams better with the cream cheese when properly mixed.
- Swap the flavorings: Replace peppermint extract with two teaspoons of almond extract for almond flavors, or use one teaspoon of peppermint extract and one teaspoon of vanilla extract for a less intense mint flavor with added depth.
- Use the right baking surface: A light-colored cookie sheet prevents the bottoms from turning golden brown too quickly. You’ll need to bake in batches since this recipe makes about 24 to 30 cookies.
- Don’t overbake these cookies: They should look barely set when you take them out of the oven, with no browning on the edges. They’ll continue firming up as they cool on the baking sheet.
- Cool on a wire rack: Let cookies cool on the baking sheet for 2 to 3 minutes, then transfer to a wire rack to cool completely and prevent soggy bottoms.
- Storage instructions: Keep baked cookies in an airtight container at room temperature for up to 5 days, refrigerate for up to 2 weeks, or freeze for up to 3 months. Unbaked shaped cookies can be frozen for three months and baked directly from frozen.
Nutrition
SERIOUSLY GOOD
DESSERTS!
Dessert First is a collection of 61 RECIPES to show you that you can make beautiful, impressive desserts right in your own kitchen, no matter your skill level.
Immediate eBook download. No physical book available.
Includes ad-free recipes like:
∙ Lemon Pound Cake
∙ Starbucks Cake Pops
∙ Boston Cream Pie
∙ Chocolate Mousse
∙ Matcha Tiramisu
...and much more!
How to Store Leftovers
These cookies stay fresh at room temperature for up to five days if you keep them in an airtight container with layers of parchment paper between them. I like using an airtight glass container to keep them fresh and crisp. The peppermint flavor actually gets stronger after a day or two.
For longer storage, freeze them in a single layer on a baking sheet first, then transfer to a freezer bag once they’re solid. They’ll keep for up to three months frozen.
You can also freeze the shaped, unbaked cookies on a baking sheet, then store them in sealed bags once frozen. When you’re ready to bake, pop them straight from the freezer into the oven and add an extra minute to the baking time. It’s like having fresh cookies whenever you want them.
What to Serve With Candy Cane Cookies
I always put these out with hot chocolate or peppermint tea during the holidays. They’re perfect for cookie swaps because they look impressive but aren’t complicated to make. The peppermint flavor pairs well with a chocolate dessert, too, so I’ll sometimes serve them alongside brownies or cake when I’m hosting.
More Easy Cookie Recipes for You to Try at Home
I’ve got plenty more cookie recipes that you might love.