
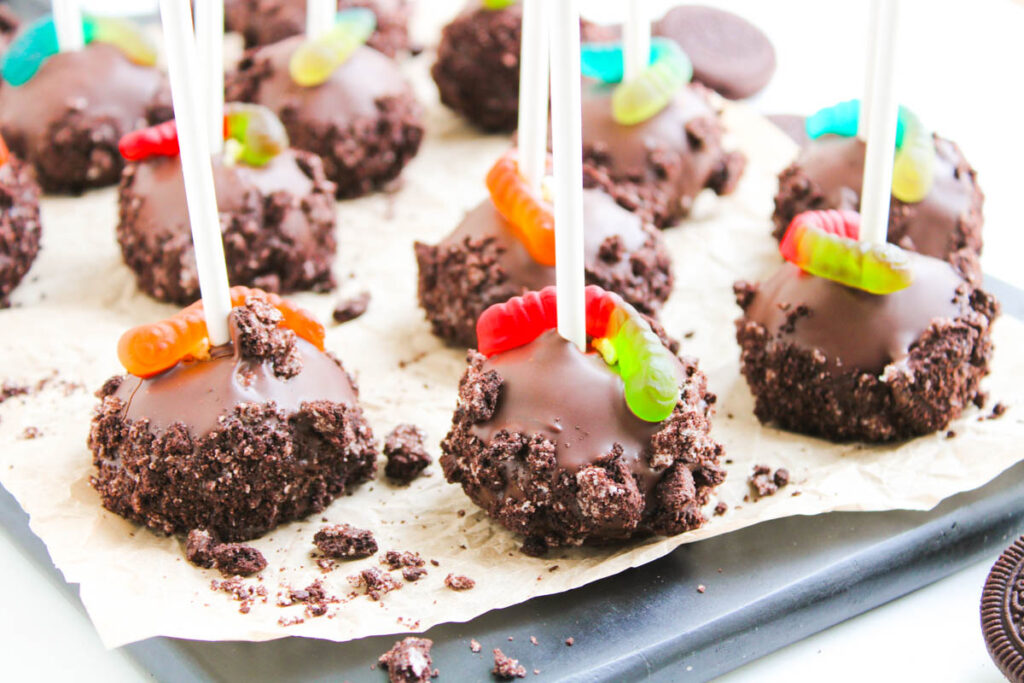
I love desserts that double as a feast for the eyes as much as the taste buds, and Worms and Dirt Cake Pops hit both marks. You’ve got a treat that’s soft and chocolatey inside with Oreo crunch on the outside, all while looking fun, wild, and playful. Putting them together may look challenging, but it actually comes down to a tiny step that makes them sturdy and party-ready.
This post contains affiliate links. As an Amazon Affiliate, if you purchase through those links, I earn a commission. Thank you!
This cake pop recipe is as flexible as the gummy worms; they fit right in for Halloween desserts, birthday parties, or even Easter gatherings and other themed celebrations when you want something whimsical and easy to share. They’re cute and crowd-friendly, and a great way to get the kids involved in the kitchen. They also store and freeze well if I’m stashing extras for later.
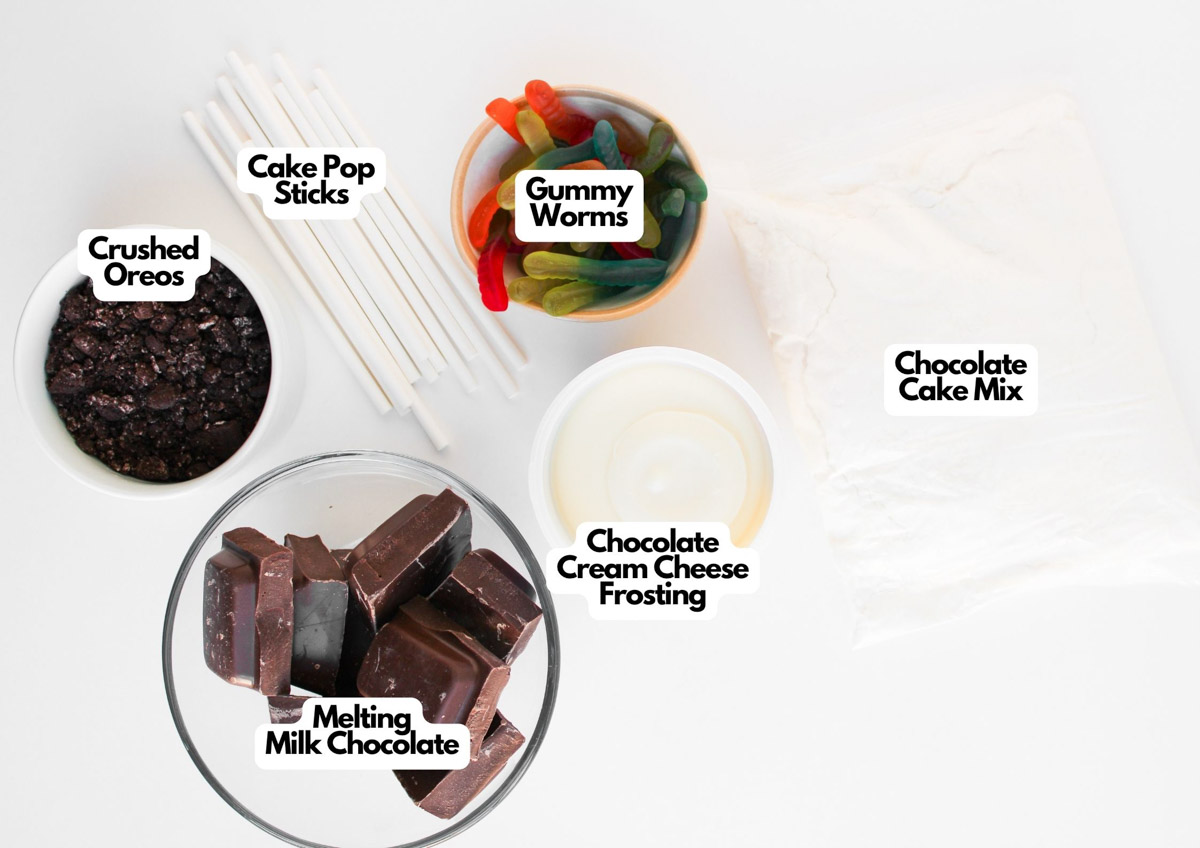
Ingredients You’ll Need
You’ll need all the ingredients shown in the photograph below.
How to Make Worms and Dirt Cake Pops with Step-By-Step Instructions
Scroll down for the full recipe card containing a full printable recipe and measurements in both US customary and metric units.
Follow my simple steps and you’ll see just how easy it is to turn a basic cake mix into something fun and party-ready.
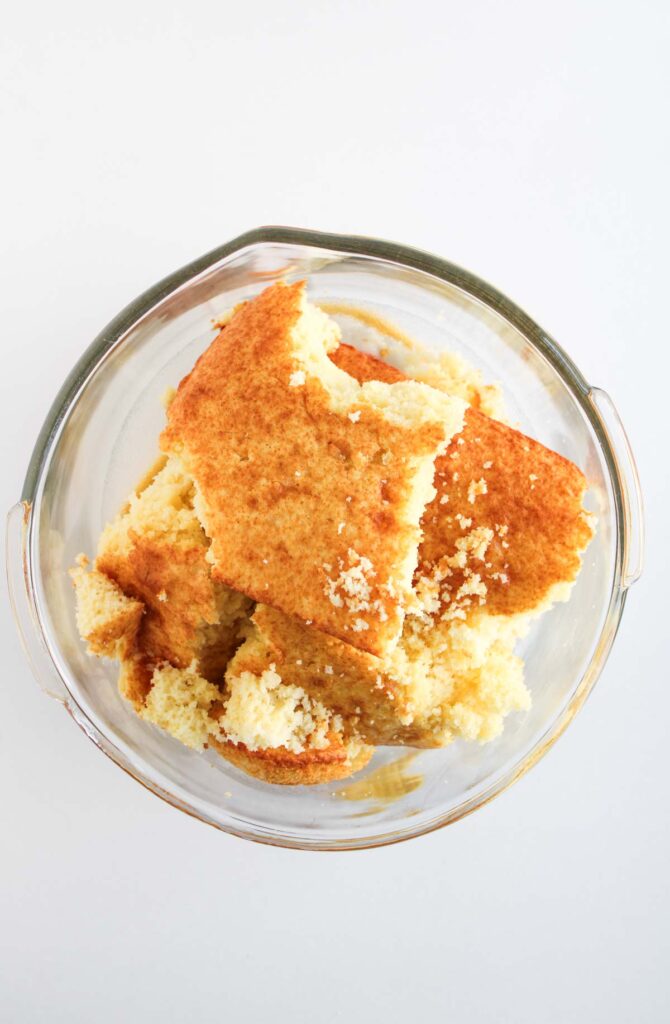
Bake and Cool the Cake
Mix up your boxed cake mix according to the directions (with butter if your mix calls for it) and bake until done. I use a nonstick baking pan for even baking and easy cleanup, and line it with parchment, leaving a bit of overhang on the sides, to easily release the cake once baked.
Make sure the cake cools all the way before moving on; otherwise, the crumbs won’t hold together properly. To speed up the process, I place the whole cake slab, with the parchment still on, over a cooling rack set on a tray to keep my counter mess-free.

SERIOUSLY GOOD
DESSERTS!
Dessert First is a collection of 61 RECIPES to show you that you can make beautiful, impressive desserts right in your own kitchen, no matter your skill level.
Immediate eBook download. No physical book available.
Includes ad-free recipes like:
∙ Lemon Pound Cake
∙ Starbucks Cake Pops
∙ Boston Cream Pie
∙ Chocolate Mousse
∙ Matcha Tiramisu
...and much more!

Crumble into Small Pieces
Break the cooled cake into fine crumbs in a large bowl. I use my hands, wearing food-grade prep gloves, to control and feel the texture better as I crumble the cake. This glass mixing bowl makes this step less messy and gives you room to work the mixture evenly.
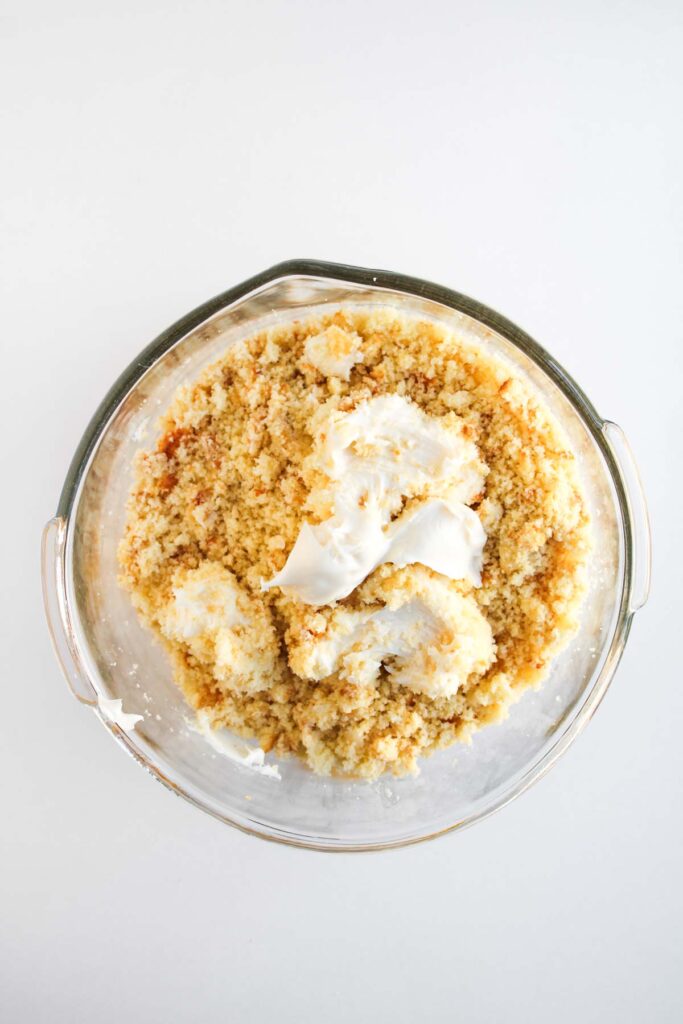
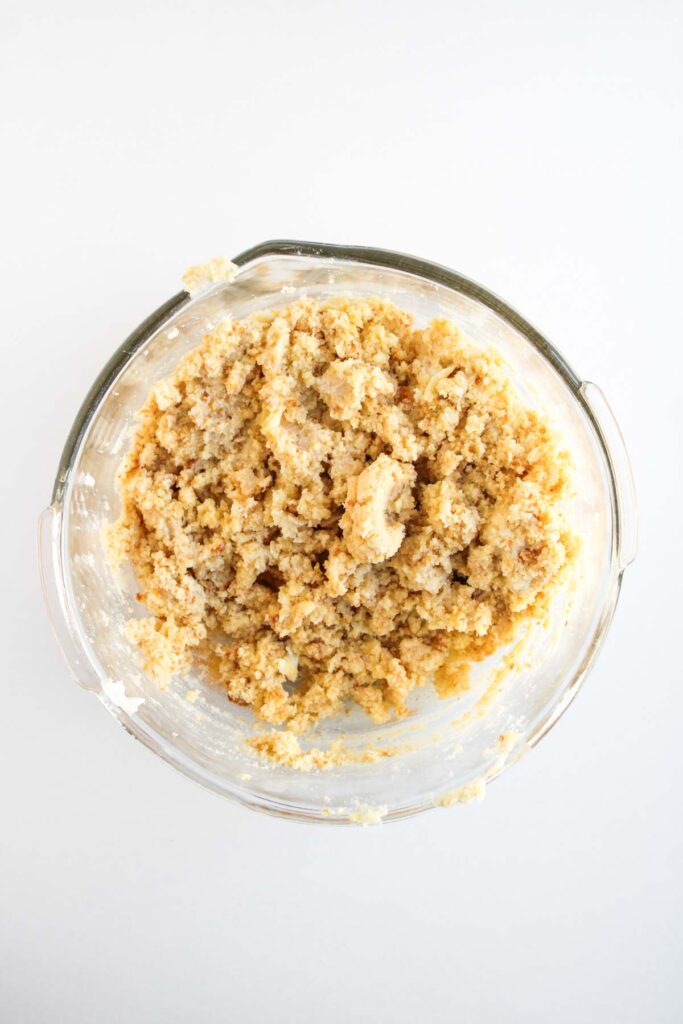
Mix with Frosting
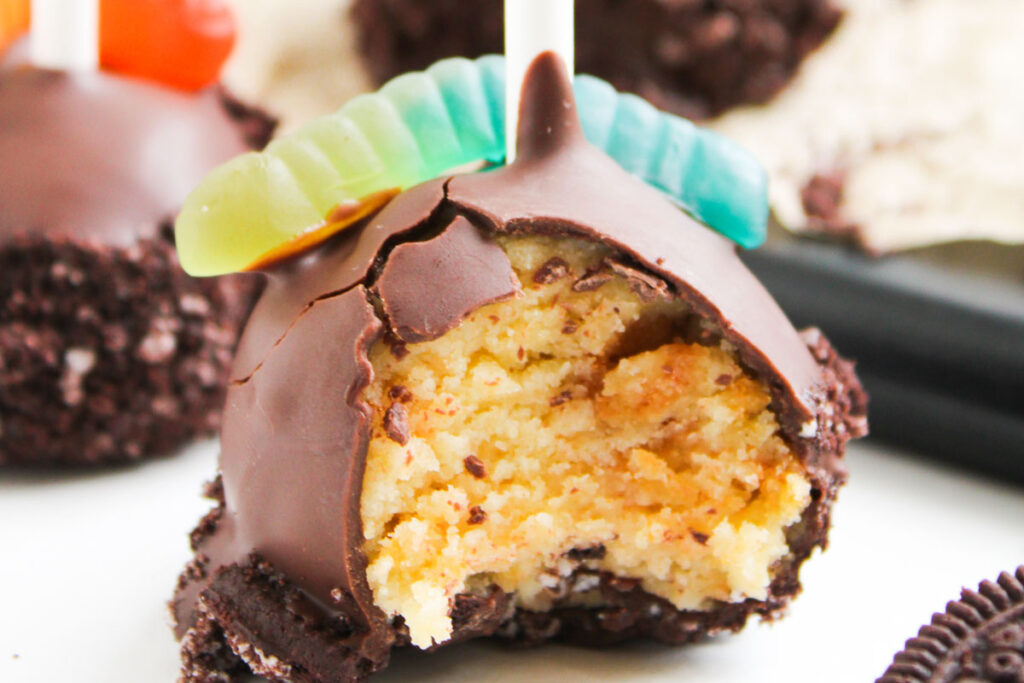
Stir in the frosting until it’s moist and feels like a dough that you can press together easily without falling apart. You want a texture that holds its shape but is not overly sticky.
If you’re using a vanilla cream cheese mixture, combine it gently with a whisk or an electric mixer until it feels smooth once rolled. I like to use a hand mixer here so it blends quickly without turning the crumbs into a total mush, though a balloon whisk works just as fine.
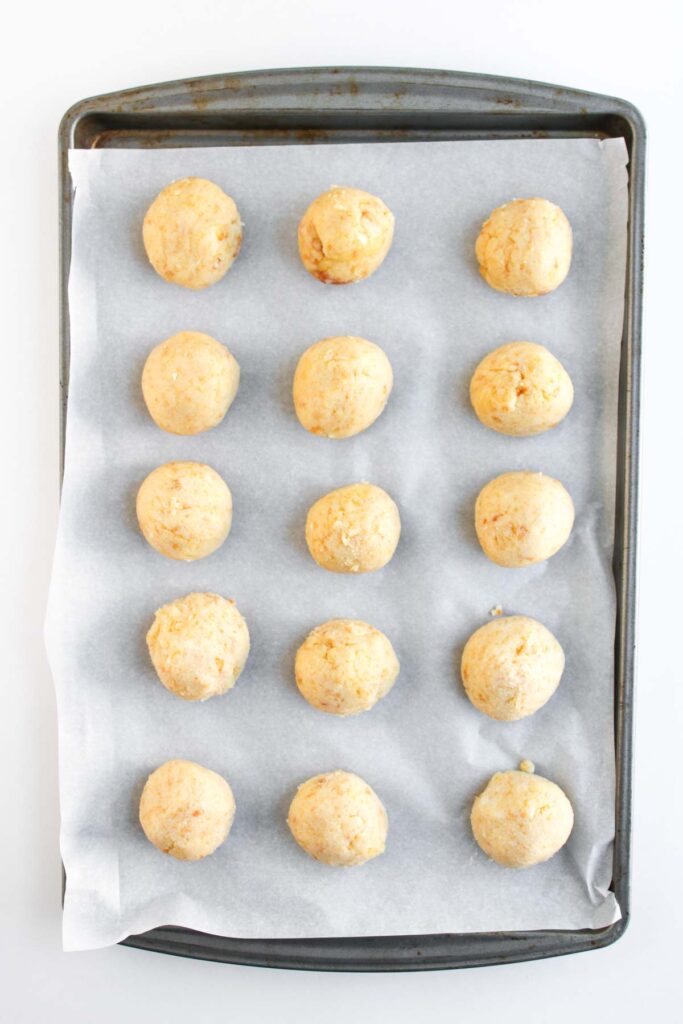
Shape the Cake Balls
Scoop out about 2 to 3 tablespoons at a time, roll them into balls, and line them up on a parchment-lined baking sheet, so they don’t stick. If you go with two scoops, stick with two for all. Same with 3, so you get even individual portions of cake balls.
A cookie scoop keeps the portion sizes even and makes shaping so much faster, while a nonstick parchment paper prevents them from sticking.
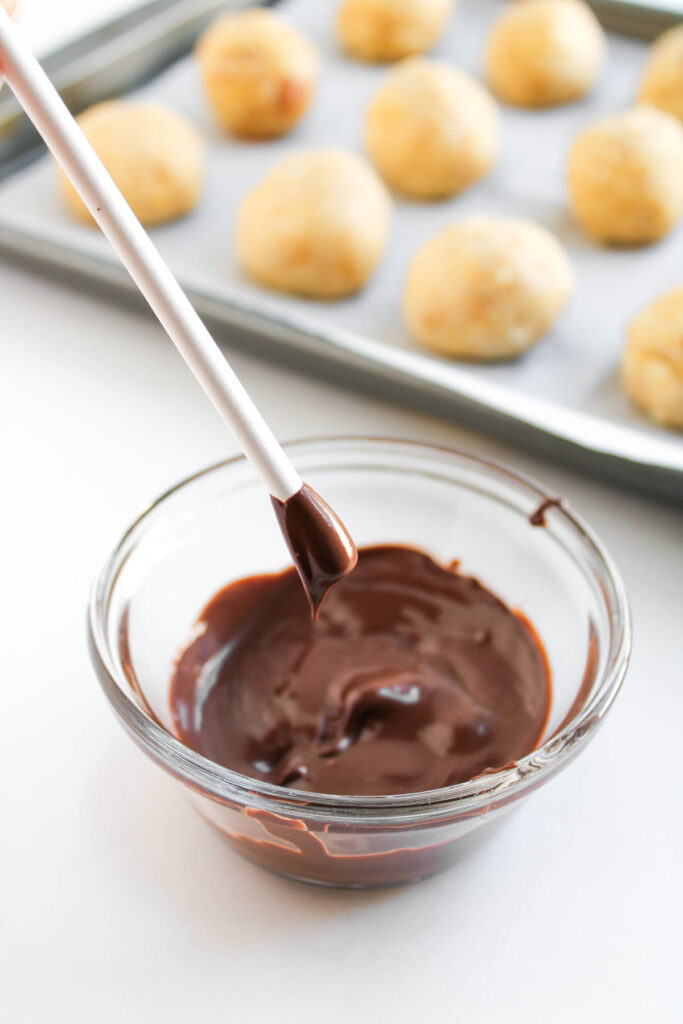
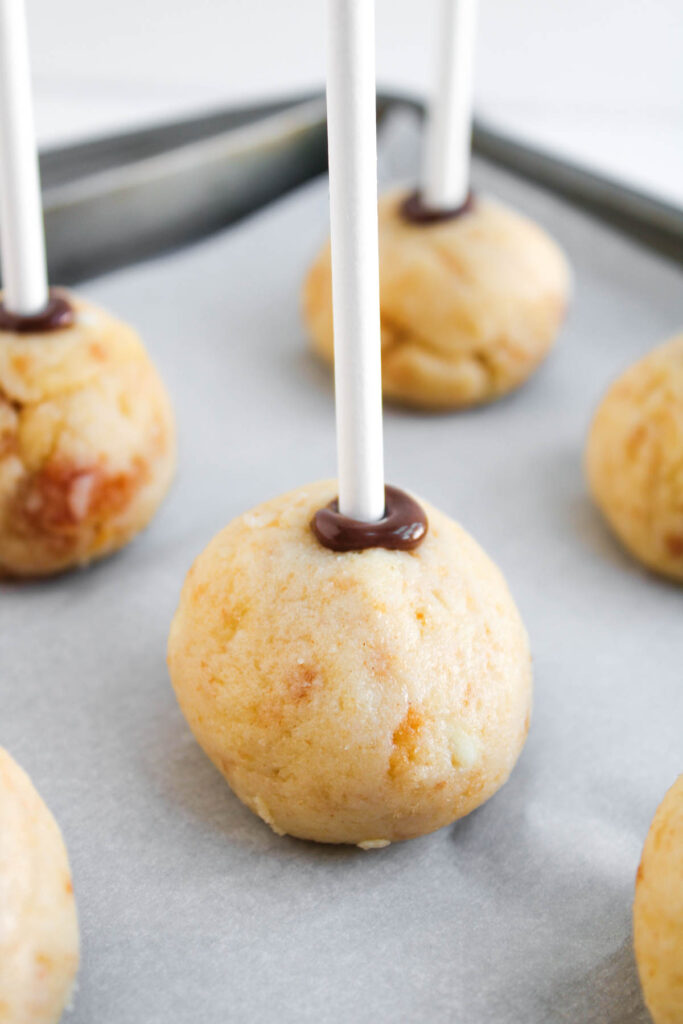
Insert the Sticks
Melt just a little chocolate, dip the tip of each stick in it, and push it halfway into each cake ball. This seals the stick in place. If you melt all the chocolate at once, it will start to set and harden by the time you’re ready to dip, which makes it harder to coat the pops smoothly.
I use these cake pop sticks; they’re sturdy and don’t bend easily. Freeze the pops for about 15 minutes so they firm up and don’t slide off later. You’ll want to use a heavy-duty freezer-safe sheet pan like this one that doesn’t warp or crack in the cold.
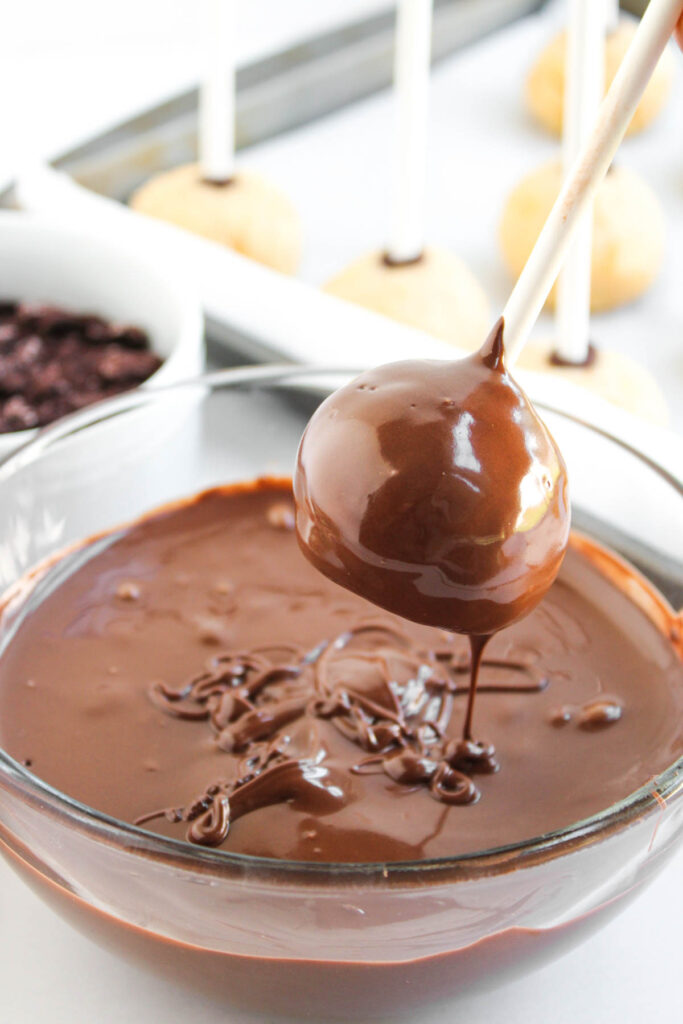
Coat in Chocolate
Melt the rest of your chocolate in the microwave, heating in short bursts or 30-second intervals and stirring until smooth. This small glass bowl is microwaveable and is deep enough for dipping each cake ball.
Dip each pop into the chocolate, turning to coat fully, then gently tap off any excess so you don’t end up with uneven or a heavy coating that cracks.
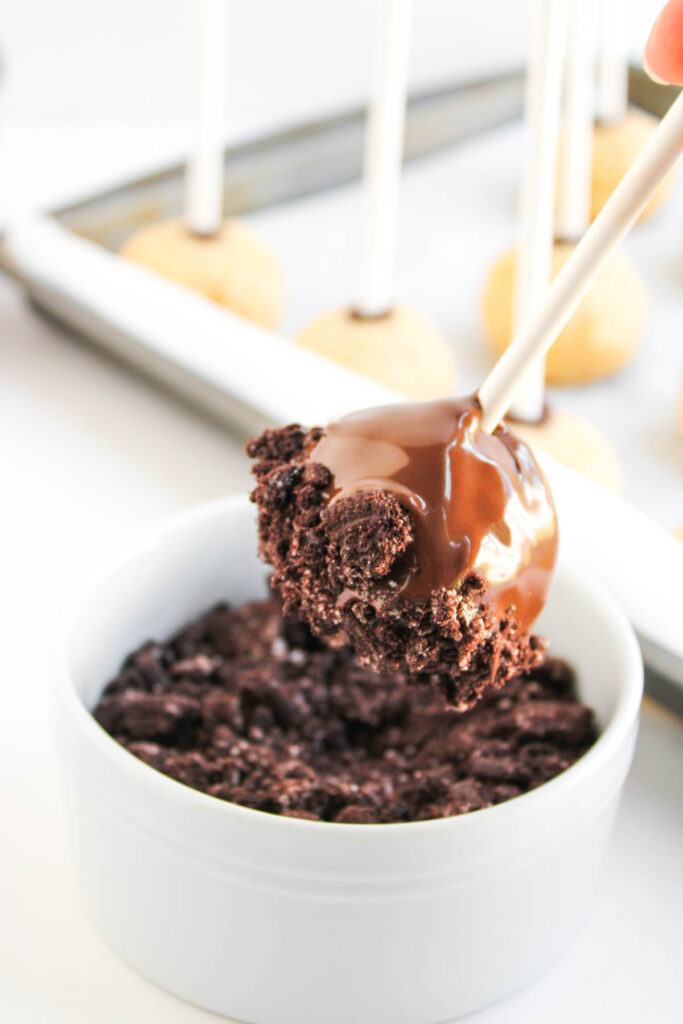
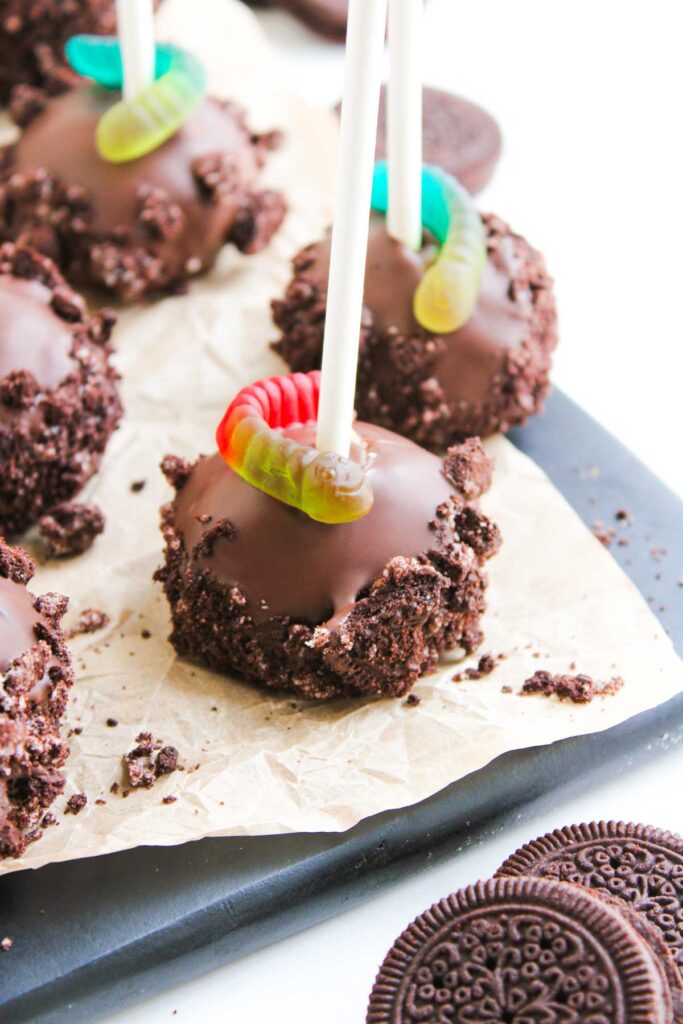
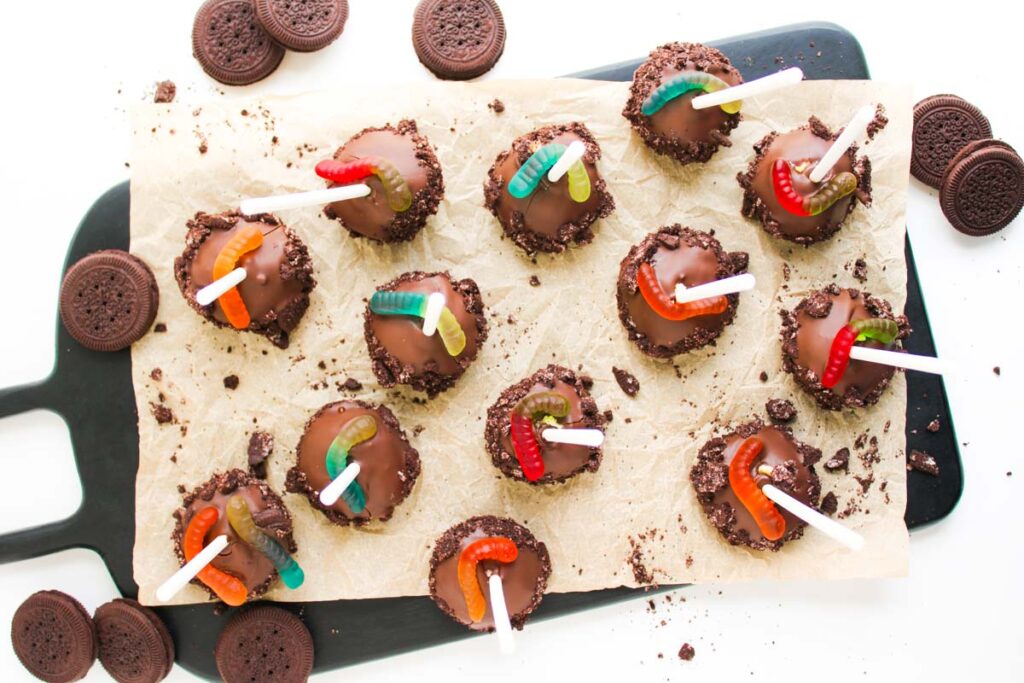
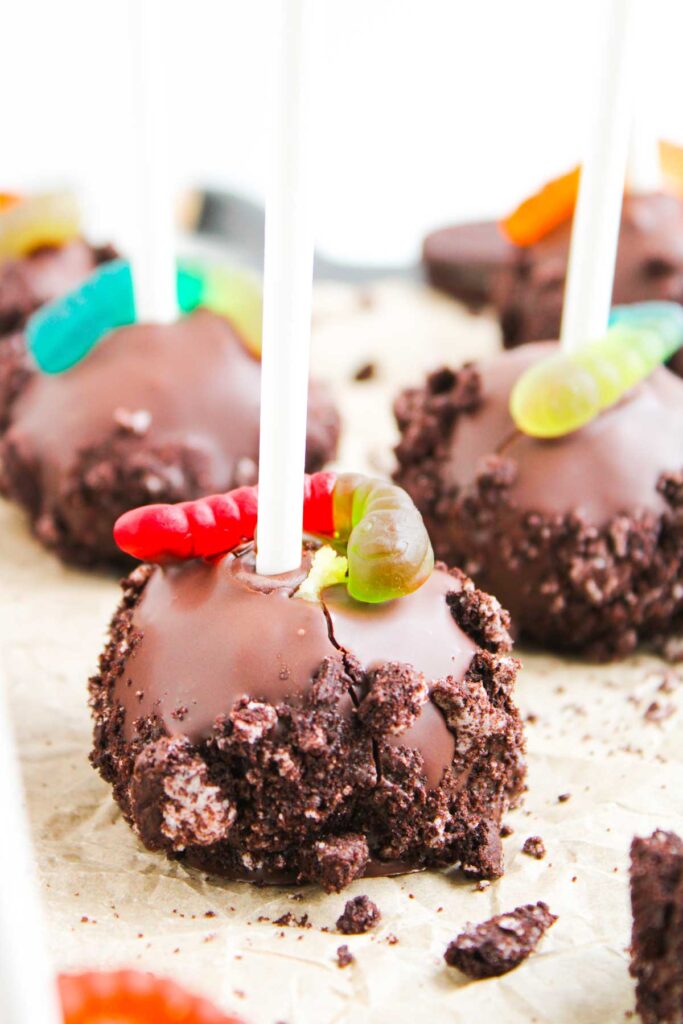
Add Oreo Dirt and Worms
Before the coating sets, roll each pop in crushed Oreo cookies. This gives the classic dirt dessert look. You can use a rolling pin and a zip-top bag here, or a food processor if you want to crush the Oreos more quickly.
Press a gummy worm on top so it sticks while the chocolate is still tacky. I like using kitchen food tweezers for this part to keep the placement neat without smudging the chocolate.
Set and Serve
Stand the pops upright in a holder, a block of styrofoam, or even keep them on the lined baking tray or dish if that’s what you’ve got. I love setting them up in this cake pop stand, where they stay upright, look great on display, and are ready to grab.
Once the chocolate hardens completely, serve these fun dirt cake treats and enjoy!
If you’re bringing these to a party, pack them carefully in a large sheet cake carrier so they stay intact and lie comfortably without getting smushed during transport. Make sure to keep them cool in an insulated casserole bag if it’s warm out, so the chocolate doesn’t melt on the way.
Recipe Notes and Expert Tips
I’ve learned a few tips and easy variations from making this dirt cake recipe over and over, and here’s how to make sure yours turn out perfect every time.
- Cool the cake fully: Don’t rush this step. A warm cake will make the crumbs clump together unevenly.
- Make the cake pops sweeter: Mix powdered sugar into the frosting if you want the filling a little sweeter and firmer.
- Replace the frosting if you want: Use Cool Whip or whipped topping instead of frosting for a lighter flavor, but plan to freeze longer so the pops hold their shape.
- Dip the sticks in chocolate first: This little trick keeps the sticks from sliding out when you dip the pops.
- Work with a few pops at a time: Only dip a few pops at once so you can roll in Oreo cookie crumbs before the coating sets. If you dip too many at once, the chocolate may start to harden before you can even press the crushed Oreos and worms.
- Stand them upright to set: Use a pop stand or styrofoam block to dry them evenly without flat spots.
- Let them harden before storing: If you rush storage, condensation can make the coating sticky. So, let the chocolate harden at room temperature first.
- Use creative displays: Stick the pops into tightly packed Oreo crumbs in a glass or jar like a flower pot for a cute dirt cake recipe presentation.
How to Store Leftovers
Keep your cake pops in an airtight container at room temperature for 2 days, or in the refrigerator for up to 5 days to make them last longer. I store mine in this glass casserole dish with a lid since it’s spacious enough for the cake pops and seals very well, keeping them fresh.
They also freeze well; just place them in a freezer-safe bag with parchment between layers and freeze for up to a month. I use a large freezer bag that can fit the cake pops with their sticks, and sometimes, I use this ice cream tub.
When you’re ready to serve, move them to the fridge to thaw overnight so they hold their shape without cracking or getting sticky.
More Easy Recipes for You to Try at Home
I’ve got plenty more fun and creative desserts that will be just as big of a hit as these cake pops:
Did you make this recipe? We’d love to know! Please leave a 5-star review below (it really helps!) and tag and follow us on Pinterest and Facebook for more tasty inspiration!

Worms and Dirt Cake Pops
Equipment
Ingredients
- 1 (13.25 ounces) box vanilla or chocolate cake mix (plus ingredients called for on the box)
- 1¼ cups chocolate or vanilla cream cheese frosting
- 10 ounces melting milk chocolate or semi-sweet
- 1 cup crushed Oreos
- 12 to 16 cake pop sticks
- 12 to 16 gummy worms
Instructions
- Prepare the cake mix according to the package instructions. Let it cool completely.1 (13.25 ounces) box vanilla or chocolate cake mix
- Crumble the cooled cake into a large bowl. Add the frosting and mix until it forms a moist, dough-like texture.1¼ cups chocolate or vanilla cream cheese frosting
- Roll into balls using 2 to 3 tablespoons of the mixture for each. Place on a parchment-lined baking sheet.
- Melt a small amount of chocolate. Dip the tip of each cake pop stick into the chocolate, then insert it halfway into a cake ball. Freeze the pops for 15 minutes to help them set.12 to 16 cake pop sticks, 10 ounces melting milk chocolate
- Melt the remaining chocolate in 30-second intervals in the microwave, stirring until smooth. Dip each cake pop into the melted chocolate, coating it fully. Gently tap to remove excess chocolate. Immediately roll each coated pop in crushed Oreos and press a gummy worm on top before the chocolate sets.1 cup crushed Oreos, 12 to 16 gummy worms
- Place cake pops upright in a holder or on parchment paper until the chocolate is fully hardened.
- Serve and enjoy your fun dirt cake treats!
Notes
- Cool the cake fully: Don’t rush this step. A warm cake will make the crumbs clump together unevenly.
- Make the cake pops sweeter: Mix powdered sugar into the frosting if you want the filling a little sweeter and firmer.
- Replace the frosting if you want: Use Cool Whip or whipped topping instead of frosting for a lighter flavor, but plan to freeze longer so the pops hold their shape.
- Dip the sticks in chocolate first: This little trick keeps the sticks from sliding out when you dip the pops.
- Work with a few pops at a time: Only dip a few pops at once so you can roll in Oreo cookie crumbs before the coating sets. If you dip too many at once, the chocolate may start to harden before you can even press the crushed Oreos and worms.
- Stand them upright to set: Use a pop stand or styrofoam block to dry them evenly without flat spots.
- Let them harden before storing: If you rush storage, condensation can make the coating sticky. So, let the chocolate harden at room temperature first.
- Use creative displays: Stick the pops into tightly packed Oreo crumbs in a glass or jar like a flower pot for a cute dirt cake recipe presentation.
Nutrition
SERIOUSLY GOOD
DESSERTS!
Dessert First is a collection of 61 RECIPES to show you that you can make beautiful, impressive desserts right in your own kitchen, no matter your skill level.
Immediate eBook download. No physical book available.
Includes ad-free recipes like:
∙ Lemon Pound Cake
∙ Starbucks Cake Pops
∙ Boston Cream Pie
∙ Chocolate Mousse
∙ Matcha Tiramisu
...and much more!