

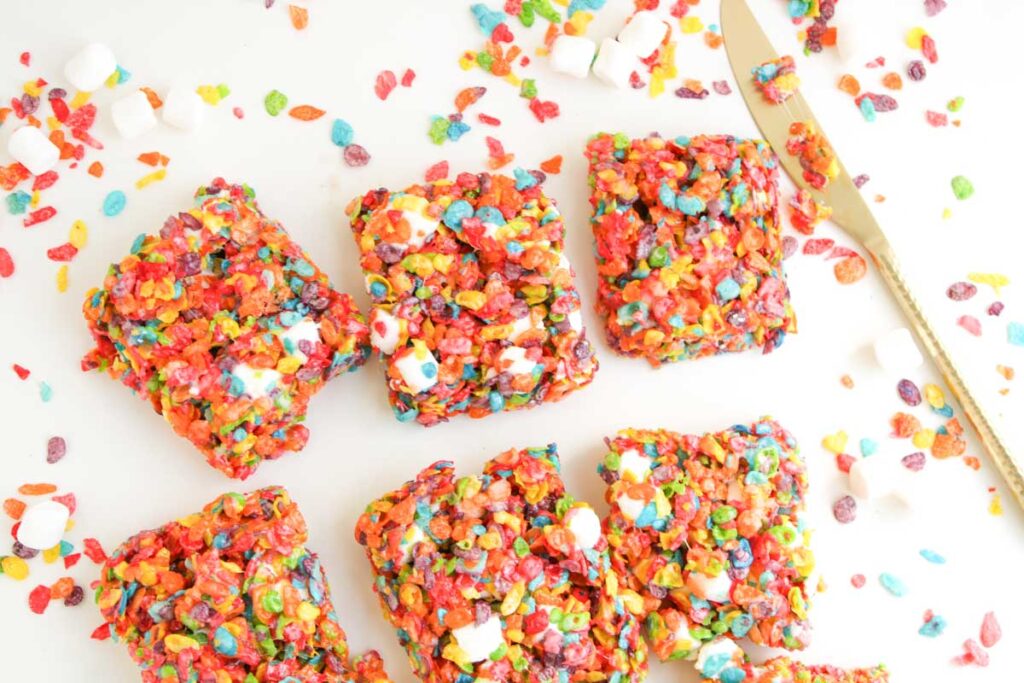
Fruity Pebble Rice Krispies are everything I love about Rice Krispie treats but sweeter, softer, and more fun. That fruity cereal brings bright flavor while the marshmallow stays gooey and stretchy throughout. Every bite is chewy and colorful, tasting like childhood but better. You’ll catch yourself going back to the pan all day long.
This post contains affiliate links. As an Amazon Affiliate, if you purchase through those links, I earn a commission. Thank you!
I make them for birthday parties, bake sales, and potlucks because they’re colorful, kid-friendly, and don’t need any baking. Perfect for summer celebrations and holiday dessert tables when you want something bright and fun that doesn’t heat up the kitchen. The bars stay soft at room temperature for about 3 days or can be frozen for up to 2 months.
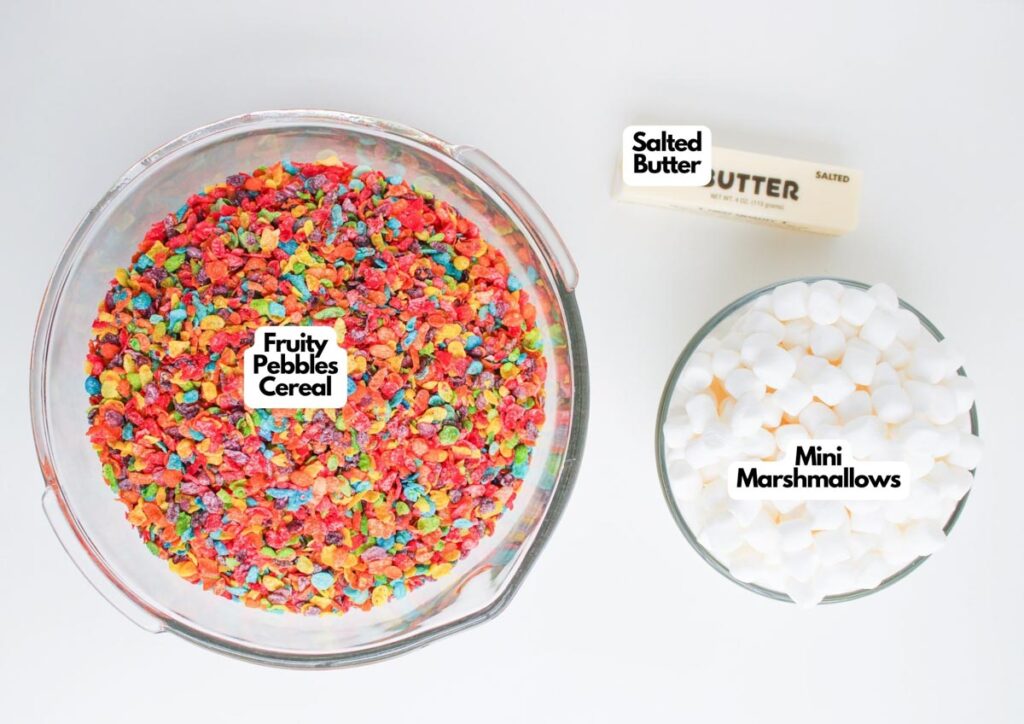
Ingredients You’ll Need
You’ll need all the ingredients shown in the photograph below.
How to Make Fruity Pebble Rice Krispies with Step-By-Step Instructions
Scroll down for the full recipe card containing a full printable recipe and measurements in both US customary and metric units.
I’ll walk you through making these colorful, gooey, no-bake desserts from start to finish.
Prep Your Pan
Line a 9×13-inch baking dish with aluminum foil or parchment paper, then lightly coat it with nonstick spray. I like using this ceramic baking dish because it gives you perfectly sized bars that aren’t too thick or too thin. Set it aside while you make the marshmallow mixture.
Melt the Butter and Marshmallows
In a large pot over medium heat, melt the butter. Once it’s completely melted, add 1 full bag of mini marshmallows, about 10 ounces total, so reserve half a bag for later. Stir frequently with a silicone spatula until the marshmallows are completely melted and smooth.
If you’re using unsalted butter, stir in ½ teaspoon of salt now. The butter adds richness while the marshmallows create that signature gooey texture.

SERIOUSLY GOOD
DESSERTS!
Dessert First is a collection of 61 RECIPES to show you that you can make beautiful, impressive desserts right in your own kitchen, no matter your skill level.
Immediate eBook download. No physical book available.
Includes ad-free recipes like:
∙ Lemon Pound Cake
∙ Starbucks Cake Pops
∙ Boston Cream Pie
∙ Chocolate Mousse
∙ Matcha Tiramisu
...and much more!

Mix in the Fruity Pebbles
Remove the pot from the heat immediately. Stir in all 6 cups of Fruity Pebbles, mixing until every piece of cereal is evenly coated with the melted marshmallow.
Fold in Extra Marshmallows
Fold in the remaining half bag of mini marshmallows. Don’t overmix them; you want these marshmallows to remain slightly whole for gooey, melty pockets in the final treats. They’ll soften and stretch when you bite into the bars.
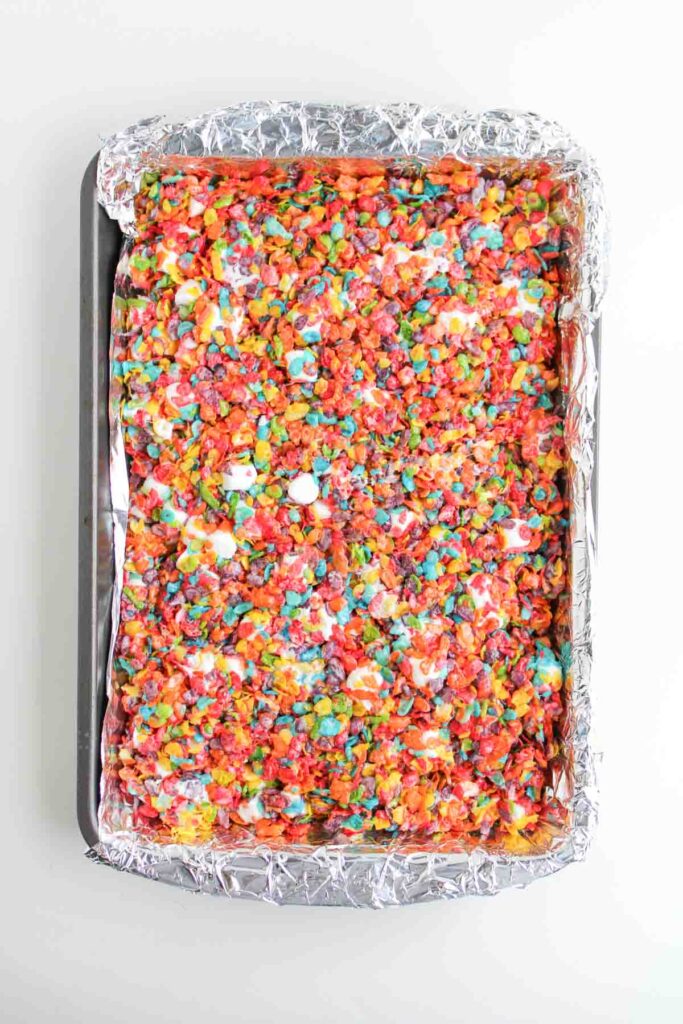
Press Into the Pan
Transfer the mixture to your prepared baking dish. Lightly spray your hands or a flexible spatula with nonstick cooking spray, then gently press the mixture into an even layer. Don’t compact it too much, or it’ll make the bars dense and hard rather than soft and pillowy.
Allow them to cool and set at room temperature for 30 to 45 minutes.
Cut and Serve
Once the treats are firm, lift them out of the pan using the foil or parchment overhang. Transfer to a cutting board and cut into bars with a sharp knife.
I like to lightly spray the knife with nonstick spray between cuts to prevent sticking. Enjoy!
These bars are ideal for parties, potlucks, or school events. I love using a sheet cake pan with a lid and handle to carry it because the bars stay protected, and the handle makes it easy to transport.
You can also layer them with parchment paper between rows when stacking. They hold their shape well and won’t get messy in transit, making them perfect for gifting or bringing to gatherings.

Fruity Pebble Rice Krispies
Ingredients
- 4 tablespoons salted butter or unsalted + ½ teaspoon salt
- 10 ounces mini marshmallows around 1 ½ bags
- 6 cups Fruity Pebbles cereal
Instructions
- Line a 9×13-inch baking dish with aluminum foil or parchment paper. Lightly coat with nonstick spray and set aside.
- In a large pot over medium heat, melt the butter. Once melted, add 1 full bag of mini marshmallows. Stir frequently until completely melted and smooth. If using unsalted butter, stir in ½ teaspoon of salt now.4 tablespoons salted butter, 10 ounces mini marshmallows
- Remove the pot from the heat. Immediately stir in the Fruity Pebbles, mixing until they’re evenly coated with the melted marshmallow.6 cups Fruity Pebbles cereal
- Fold in the remaining ½ bag of mini marshmallows. These will stay slightly whole for a gooey, melty texture in the final treats.
- Transfer the mixture to your prepared baking dish. Lightly spray your hands or a spatula with nonstick spray, then gently press the mixture into an even layer without compacting too much (for softer bars). Allow to cool and set at room temperature for 30–45 minutes.
- Once firm, lift out of the pan and cut into bars. Serve immediately or store in an airtight container for up to 3 days.
Notes
- Don’t overheat the marshmallows: Melt them over medium heat and stir frequently so they don’t scorch or turn rubbery. Once they’re smooth, remove the pot from the heat immediately.
- Use fresh marshmallows: Fresh marshmallows melt smoother and create better flavor and texture than stale ones, making softer, gooier bars that taste just like classic rice krispie treats. You can also measure using cups of marshmallows instead of bags; use about 4 cups for melting and 1 cup for folding in.
- Reserve half the marshmallows: Folding in extra mini marshmallows after mixing the cereal creates gooey pockets throughout the bars instead of a uniform texture.
- Press gently: Use a light hand when pressing the mixture into the pan. Compacting too much makes the bars dense and hard instead of soft and pillowy.
- Try cocoa pebbles in place of the Fruity Pebbles: Swap the cereal for cocoa pebbles if you want a chocolate flavor instead of fruity. The recipe works exactly the same way, but you’ll get rich chocolate-brown bars instead of rainbow colors. You can also drizzle melted white chocolate over the cooled bars for extra sweetness.
- Flash freeze first: Freeze the bars on a baking sheet for 1 hour before transferring to containers so they don’t stick together. This works especially well if you’re making them ahead for parties or gifting.
Nutrition
How to Store Leftovers
Store the bars in an airtight container at room temperature for up to 3 days. I like using a glass container with a tight-fitting lid to keep them soft and prevent them from drying out. If you stack them, place parchment paper between the layers to prevent sticking.
For longer storage, freeze the bars for up to 2 months. Flash-freeze them on a baking sheet for about an hour, then transfer them to a freezer-safe container or bag. Thaw at room temperature for 15 to 20 minutes before serving, and they’ll taste just as soft and gooey as the day you made them.
SERIOUSLY GOOD
DESSERTS!
Dessert First is a collection of 61 RECIPES to show you that you can make beautiful, impressive desserts right in your own kitchen, no matter your skill level.
Immediate eBook download. No physical book available.
Includes ad-free recipes like:
∙ Lemon Pound Cake
∙ Starbucks Cake Pops
∙ Boston Cream Pie
∙ Chocolate Mousse
∙ Matcha Tiramisu
...and much more!
What to Serve With Fruity Pebble Rice Krispies
These treats are sweet and colorful on their own, but I love serving them alongside vanilla ice cream for birthday parties or scoops of strawberry ice cream for a fruity dessert board. They’re also great with fresh strawberries, sliced bananas, or a glass of cold milk for an after-school snack.
For parties, set them out with other no-bake treats like chocolate-covered pretzels, brownie bites, or sugar cookies. The rainbow colors make them a natural fit for spring celebrations, Easter baskets, or kids’ sleepovers where you want something fun and easy to grab.
More Easy Recipes for You to Try at Home
I think you’ll also love these other easy dessert recipes.

